Half Real So, for the last few months I’ve taken a break from the PhD to do some work for a theatre show for The Border Project, Half Real.

There’s a lot of technology in the show. In particular, most of the set is projected, and we are using a Microsoft Kinect to track the actors on stage, and modifying the projections based on their location.

I’m working on Linux, and using OpenNI for interfacing with the Kinect. Things almost worked perfectly. In this post I will document the trials and tribulations of getting the Kinect to work for Half Real.

I often fall into

Not Invented Here Syndrome, and so slowly I’m trying to get out of it. Obviously, interfacing with hardware like the Kinect is not something I really wanted to do during a 3 month theatre development. My Spatial Augmented Reality framework is built on Linux, so I basically had the option of Libfreenect or OpenNI. OpenNI appears to be more mature, and so that’s what I went with.

As you can see, I’m only really tracking the position of the actors – we aren’t using any of the gesture recognition stuff.

During development everything looked peachy. However, during production week when we started running through the whole show, a major issue popped up. It turns out there is a bug buried deep in OpenNI that eventually rears its ugly head if you have a few people running around at the same time:

Program received signal SIGSEGV, Segmentation fault.
 0x00007ffff215574d in Segmentation::checkOcclusion(int, int, int, int)

This is a big problem. See, this is a theatre show, where the entire set is projected. If the system crashes, the stage goes black. The operator has to restart and bring the projections up to the right point in the show. It turned out that in our tech previews, the software was crashing 2-3 times per show. This was simply unacceptable.

Thankfully, I was only interested in the positions of the actors. This meant I could run the tracking in a completely different process and send the data to the projection system without too much overhead. So, on the day before I finished working for the project, I had to completely rewrite how the tracking worked.

The Data We Need

As I said, we only need position. I didn’t have to send through any camera images, gesture information, etc. All I needed was:

struct KinectMessage
{
    uint8_t actor_id;
    float   quality;
    float   x;
    float   y;
    float   z;
};

The process that interfaces with the Kinect simply sent these messages over a TCP connection to the projection system for every actor on stage. TCP worked pretty well. Both processes run on the same system, and the Kinect only updates at 30fps anyway. So you know, there’s only 510 bytes per second, per actor that needed to be transferred. If I was transferring images, a better IPC technique would be required.

While True

At this point, the hard work was done. Simply wrap the tracking process in a shell script that loops forever, rerunning the process when the segfault occurs. The projectors never go to black, and the worst case is the tracking lags for a a couple of seconds. Not perfect, but infinitely better.

I guess the moral of this post is to be wary of relying on 3rd party libraries that are not particularly mature. And if you have to (you don’t have much choice if you want to talk to the Kinect), wrap it up so it can’t screw you over. TCP worked for me, because I didn’t need to transfer much data. Even if you were doing the skeleton tracking and gestures, there isn’t a lot of data to send. If you need the images from the camera, TCP may not be for you. But there are plenty of other IPC techniques that could handle that amount of data (even pipes would do it). I guess the good news is OpenNI is Open Source, so in theory someone can get around to fixing it.

Hope this helps someone.

Michael

Join the conversation!

Hit me up on Twitter or send me an email.
Posted on September 22, 2011ProgrammingTags: Border Project, c++, Half Real, kinect, Linux, OpenNI, ubuntu

UPDATE October 2015: Verified working in Ubuntu 14.04 LTS and 15.04!

I’ve spent all this morning trying to talk to the Microsoft Kinect using OpenNI. As it turns out, the process is not exceptionally difficult, it’s just there doesn’t seem to be any up to date documentation on getting it all working. So, this post should fill the void. I describe how to get access to the Kinect working using Ubuntu 12.04 LTS, OpenNI 1.5.4, and NITE 1.5.2.

Please note that since writing this tutorial, we now have OpenNI and NITE 2.0, and PrimeSense have been bought by Apple. This tutorial does not work with versions 2 (though 1.5 works just fine), and there is talk of Apple stopping public access to NITE.

To talk to the Kinect, there are two basic parts: OpenNI itself, and a Sensor module that is actually responsible for communicating with the hardware. Then, if you need it, there is NITE, which is another module for OpenNI that does skeletal tracking, gestures, and stuff. Depending on how you plan on using the data from the Kinect, you may not need NITE at all.

Step 1: Prerequisites

We need to install a bunch of packages for all this to work. Thankfully, the readme file included with OpenNI lists all these. However, to make life easier, this is (as of writing) what you need to install, in addition to all the development packages you (hopefully) already have.

sudo apt-get install git build-essential python libusb-1.0-0-dev freeglut3-dev openjdk-7-jdk

There are also some optional packages that you can install, depending on whether you want documentation, Mono bindings, etc. Note that on earlier versions the install failed if you didn’t have doxygen installed, even though it is listed as optional.

sudo apt-get install doxygen graphviz mono-complete

Step 2: OpenNI 1.5.4

OpenNI is a framework for working with what they are calling natural interaction devices.Anyway, this is how it is installed:

Check out from Git

OpenNI is hosted on Github, so checking it out is simple:

git clone https://github.com/OpenNI/OpenNI.git

The first thing we will do is checkout the Unstable 1.5.4 tag. If you don’t do this, then the SensorKinect library won’t compile in Step 3. From there, change into the Platform/Linux-x86/CreateRedist directory, and run the RedistMaker script. Note that even though the directory is named x86, this same directory builds 64 bit versions just fine. So, don’t fret if you’re on 64bit Linux.

cd OpenNI
git checkout Unstable-1.5.4.0
cd Platform/Linux/CreateRedist
chmod +x RedistMaker
./RedistMaker

The RedistMaker script will compile everything for you. You then need to change into the Redist directory and run the install script to install the software on your system.

cd ../Redist/OpenNI-Bin-Dev-Linux-[xxx]  (where [xxx] is your architecture and this particular OpenNI release)
sudo ./install.sh

Step 3: Kinect Sensor Module

OpenNI doesn’t actually provide anything for talking to the hardware, it is more just a framework for working with different sensors and devices. You need to install a Sensor module for actually doing the hardware interfacing. Think of an OpenNI sensor module as a device driver for the hardware. You’ll also note on the OpenNI website that they have a Sensor module that you can download. Don’t do this though, because that sensor module doesn’t talk to the Kinect. I love how well documented all this is, don’t you?

The sensor module you want is also on GitHub, but from a different user. So, we can check out the code. We also need to get the kinect branch, not master.

git clone https://github.com/avin2/SensorKinect
cd SensorKinect

The install process for the sensor is pretty much the same as for OpenNI itself:

cd Platform/Linux/CreateRedist
chmod +x RedistMaker
./RedistMaker
cd ../Redist/Sensor-Bin-Linux-[xxx] (where [xxx] is your architecture and this particular OpenNI release)
chmod +x install.sh
sudo ./install.sh

On Ubuntu, regular users are only given read permission to unknown USB devices. The install script puts in some udev rules to fix this, but if you find that none of the samples work unless you run them as root, try unplugging and plugging the Kinect back in again, to make the new rules apply.

Step 4: Test the OpenNI Samples

At this point, you have enough installed to get data from the Kinect. The easiest way to verify this is to run one of the OpenNI samples.

cd OpenNI/Platform/Linux-x86/Bin/Release
./Sample-NiSimpleViewer

You should see a yellow-black depth image. At this point, you’re left with (optionally) installing the higher level NITE module.

Step 5: Install NITE 1.5 (optional)

Firstly, you need to obtain NITE 1.5.2. Go to the following link and download NITE 1.5.2 for your platform..

http://www.openni.org/openni-sdk/openni-sdk-history-2/

Extract the archive, and run the installer:

sudo ./install.sh

At some point, you may be asked for a license key. A working license key can be found just about anywhere on the Internet. I don’t think PrimeSense care, or maybe this is a non-commercial license or something. But whatever, just copy that license into the console, including the equals sign at the end, and NITE will install just fine.

Conclusion

After following these steps, you will be able to write programs that use the Microsoft Kinect through OpenNI and NITE middleware. I hope this helps someone, because I spent a lot of time screwing around this morning trying to get it all to work. Like I said, the process is pretty straight forward, it just hasn’t been written down in one place (or I suck at google).

Join the conversation!

Hit me up on Twitter or send me an email.
Posted on June 30, 2011ProgrammingTags: featured, kinect, microsoft, NITE, OpenNI, ubuntu

800px LaTeX logo svg  e1308095178677 I’m currently in the early stages of writing my PhD thesis. I’m writing it using LaTeX, and I’m trying to get the perfect build system and editing environment going. Yesterday I had a look at Texlipse, a plugin for Eclipse. There was one problem: EPS figures didn’t work.

In newish versions of Latex, if you use the epstopdf package, your images are converted on the fly, but this wasn’t  working in Texlipse. Luckily the fix is easy, and the rest of this post explains what to do.

Lets start with a minimum working example to demonstrate the problem:

\documentclass{minimal}
\usepackage{epsfig}
\usepackage{epstopdf}
\usepackage{graphicx}

\begin{document}

Here's an EPS Figure:

\includegraphics[height=5cm]{unisa}

\end{document}

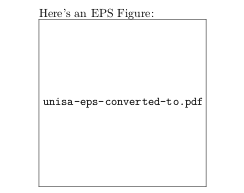
Download unisa.eps, and try this yourself. On Ubuntu, I get output that looks like this:

eps broken

Broken PDFLatex output on Ubuntu

If you look at the console output generated by TexLipse, you will see one of two problems, described below.

Problem 1: Shell escape feature is not enabled

I encountered this problem on Ubuntu. If you see the following output:

pdflatex> Package epstopdf Warning: Shell escape feature is not enabled.

Then you have encountered this. The fix is quite easy.

  1. Open up Eclipse Preferences
  2. Click on Texlipse Builder Settings
  3. Click on PdfLatex program, and press the edit button
  4. Add –shell-escape to the argument list as the first argument.
  5. You’re done! Rebuild your project and it should work fine.

Problem 2: Cannot Open Ghostscript

I encountered this problem on OSX. Weird how the two systems have the same symptoms with different causes, but whatever. If you see the output:

pdflatex> !!! Error: Cannot open Ghostscript for piped input

Then you are suffering from problem 2. This problem is caused by the PATH environment variable not being set correctly when Texclipse runs pdflatex. Essentially, the Ghostcript program, gs, cannot be found by pdflatex. The fix is to add an environment variable to Texlipse’s builder settings so the path is corrected.

Step 1: Locate Ghostscript, Repstopdf, and Perl

Open up a terminal, and type:

which gs

This should show you the directory where Ghostscript lives on your system. On my laptop it is:

/usr/local/bin

Repeat the process with repstopdf:

which repstopdf

Which on my system gives:

/usr/texbin

And with perl:

which perl

gives me:

/opt/local/bin

The exact paths will depend on how you have installed these things. For example, Perl lives in /opt on my system because I installed it using macports. It doesn’t really matter. However, if you don’t have any of these packages installed, you will need to do so.

Step 2: Create the Environment Variable

Now that we know where the programs are installed, we need to create a PATH environment variable for Texlipse to use.

  1. Open up Eclipse Preferences
  2. Go down to Environment, which is under Texlipse Builder Settings
  3. Click new to create a new environment variable
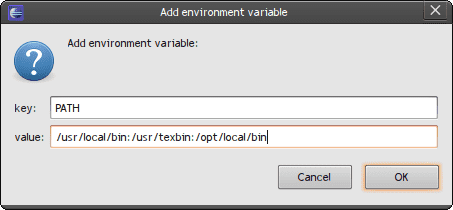
  4. the key should be set to PATH. The value should be the three directories, separated by colons (:). For example, on my system:
    add environment variable
  5. You’re done! Save the settings and everything should work.

Conclusions

If you complete the steps above, depending on what problem you had (you may have even had both), then you should see the correct output, which looks like this:

eps fixed
EPS Figure working!

Well, I hope that helps someone. Its surprising that this error came up on both of my computers. Searching the internet finds others with the same problem, but as yet no solutions. This post should fix that.

Join the conversation!

Hit me up on Twitter or send me an email.
Posted on June 15, 2011ResearchTags: eclipse, eps, epstopdf, figure, latex, mac, osx, texlipse, ubuntu

Hello Everyone

3DUI has wrapped up for the year, so here is our second publication. We introduce a new material for freeform sculpting in spatial augmented reality environments. Please read the paper, and have a look at the video below.


Join the conversation!

Hit me up on Twitter or send me an email.
Posted on March 22, 2011ResearchTags: Augmented Reality, industrial design, Programming, publication, sar, sculpting

Hey Everyone

So right now I am at the IEEE Symposium on 3D User Interfaces in Singapore. We have a couple of publications which I’ll be posting over the next few days. First up is Adaptive Color Marker for SAR Environments. In a previous study we created interactive virtual control panels by projecting onto otherwise blank designs. We used a simple orange marker to track the position of the user’s finger. However, in a SAR environment, this approach suffers from several problems:

  • The tracking system can’t track the marker if we project the same colour as the marker.
  • Projecting onto the marker changes it’s appearance, causing tracking to fail.
  • Users could not tell when they were pressing virtual controls, because their finger occluded the projection.

We address these problems with an active colour marker. We use a colour sensor to detect what is being projected onto the marker, and change the colour of the marker to an opposite colour, so that tracking continues to work. In addition, we can use the active marker as a form of visual feedback. For example, we can change the colour to indicate a virtual button press.

I’ve added the publication to my publications page, and here’s the video of the marker in action.


Join the conversation!

Hit me up on Twitter or send me an email.
Posted on March 20, 2011ResearchTags: Augmented Reality, c++, opengl, Programming, publication, sar